Photography for Compositing - Part IV: Depth of Field
- Photography Knowledge for Pursuing Photorealism
After so many years in compositing, whether in commercials or films, there’s always one question that comes up when I receive CG materials from the Lighting department and get to the point where I need to start adding depth of field:
How much depth of field is correct?
In large-scale productions, you typically receive a set of camera data (assuming it’s been properly recorded and provided). With this data, you should theoretically be able to calculate the correct depth of field for an object in relation to the camera, right? Right??”
Can the depth of field be shallower to focus more on the characters?
I genuinely believe that photography, filmmaking, and even astronomy are truly the culmination of human knowledge.
Think about it—from the initial discovery that lenses could focus light to make a fire, to the exploration of photography for the better painting references, to the study of physical optics for both photography and astronomical observation.
The way physical optics, a natural phenomenon, has been applied to photography and further to filmmaking to tell stories is incredible. As I organize this knowledge and these techniques, I find myself frequently amazed.
Depth of Field
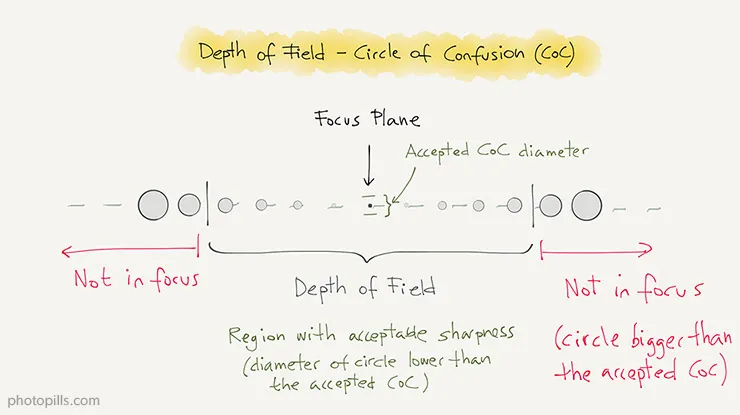
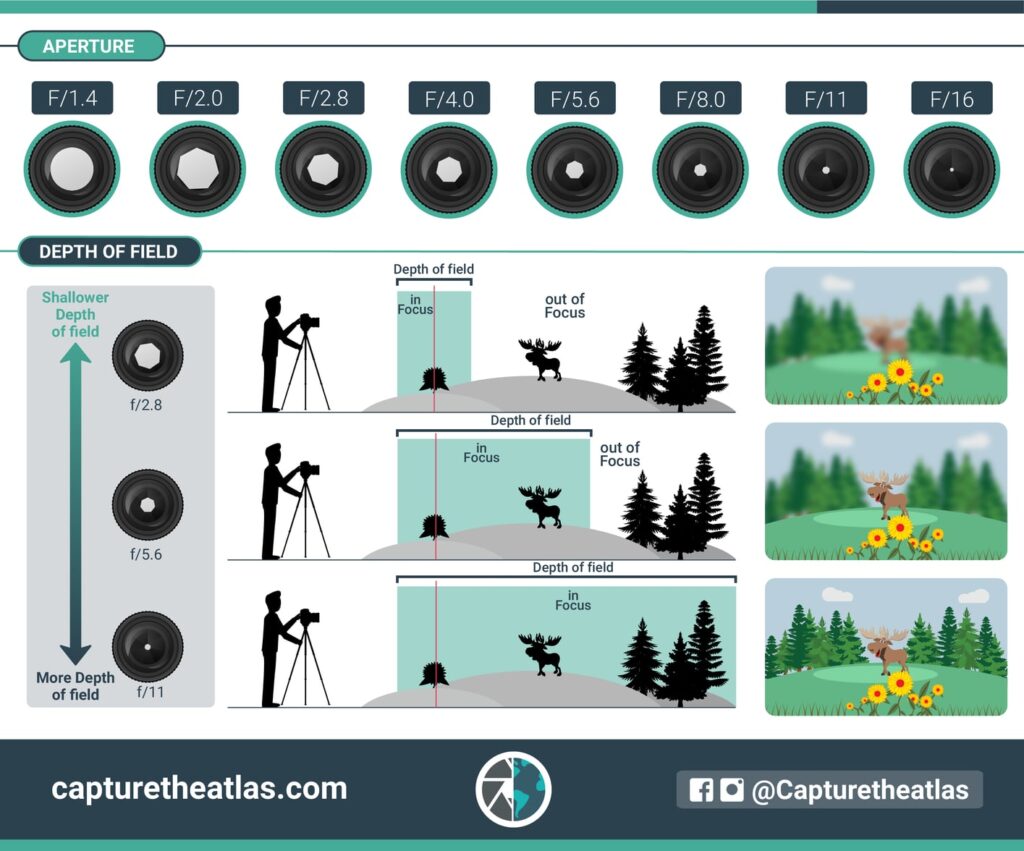
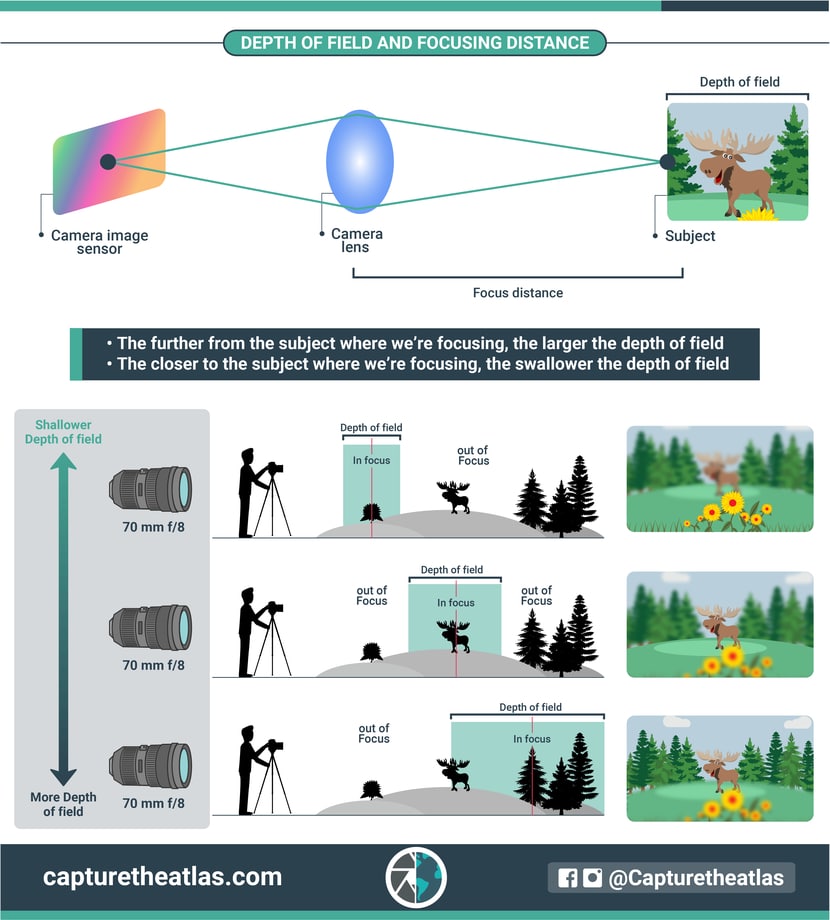
A simpler definition of depth of field is ‘the range between the nearest and farthest points that are acceptably in focus.’ The more blurred objects are outside this range, the shallower the depth of field; conversely, the clearer they are, the deeper the depth of field.
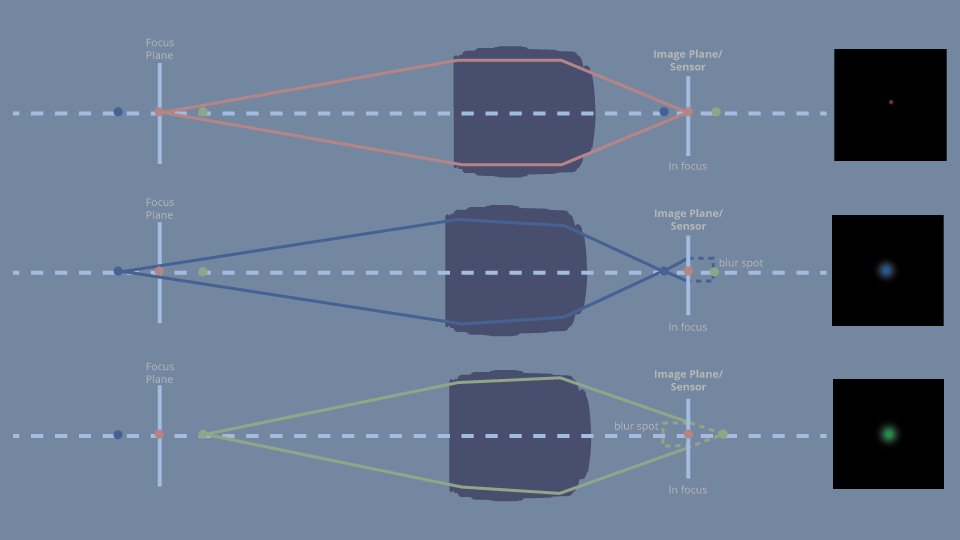
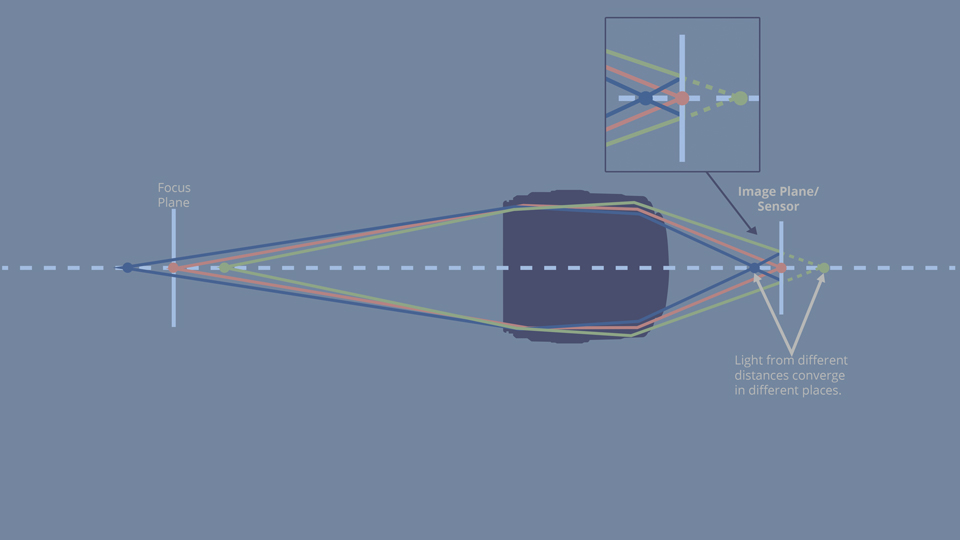
In the image above, the red dot on the focus plane represents the focus point, where the projection of image is sharp on the sensor.
The blue and green dots in front of and behind the focus plane, however, are out of focus and project blurry circles on the sensor, due to their projected images are in front of and behind the focus plane.
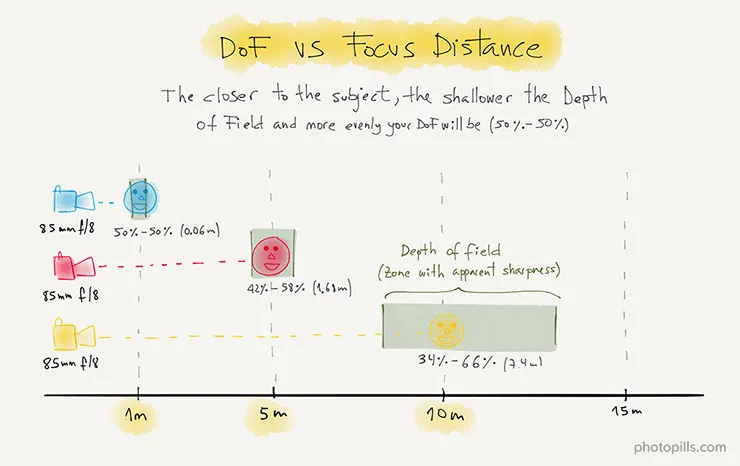
In the image above, the depth of field range is shown. The nearest point of acceptable blur is called the DoF Near Point, while the farthest point of acceptable blur is called the DoF Far Point.
It’s worth noting that when the depth of field range is extended, the sizes of the areas in front of and behind the focus point are not symmetrical.
I’m gonna repeat this for a couple of times.
Looking closely at the image, you’ll notice that as the focus distance increases and the depth of field range extends, the distance from the focus point to the far depth of field point becomes longer than the distance from the focus point to the near depth of field point. Conversely, with a shallower depth of field, the range becomes narrower, and the lengths on either side of the focus point tend to become more equidistant.
Circle of Confusion
What defines acceptable defocus or acceptable sharp??
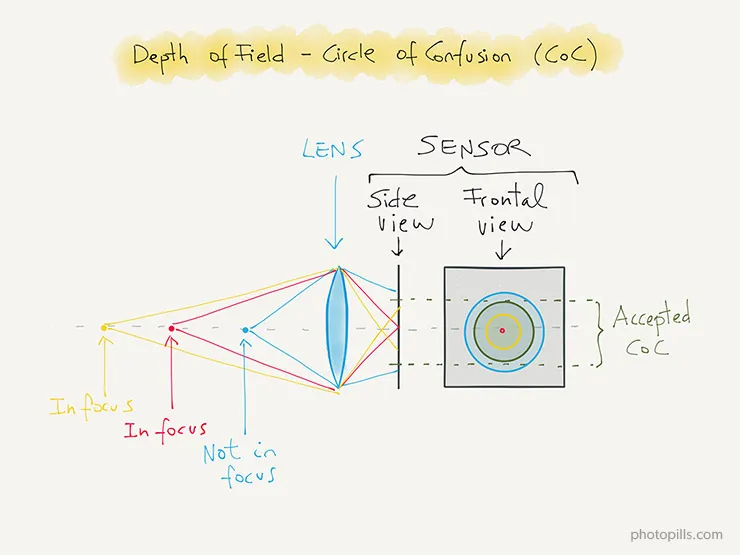
The maximum value of acceptable defocus is called the Circle of Confusion, which is confusing.
the red dot represents the focus point and the sharpest reference. The green circle indicates the size of the circle of confusion for this image. Blue circles larger than the circle of confusion are considered out of focus. Yellow circles, although blurred, are still within the circle of confusion and therefore considered in focus.
The size of the circle of confusion is somewhat subjective, but a more formulaic definition is based on conclusions from the printing industry and developments in optometry over the years:
At a viewing distance of 25 centimeters, the maximum blur point for an 8×10 inch image, viewed with a visual acuity of 1.0, is 0.029 mm.
The definition above is calculated in a relatively rigorous manner, but in practice, we can’t know the final image size—such as the projection screen size in a cinema. Additionally, the size of the circle of confusion can vary depending on the camera model.
Therefore, when discussing the degree of blur, we use the concept of the circle of confusion but rely on calculations based on the angle of light passing through the lens and triangular mathematics, rather than the definition provided above.
The four key components of depth of field
To better explain the components of depth of field, before diving into how to affect its size, this section will first provide a simple explanation of the definitions and roles of the four factors affecting depth of field.
Aperture
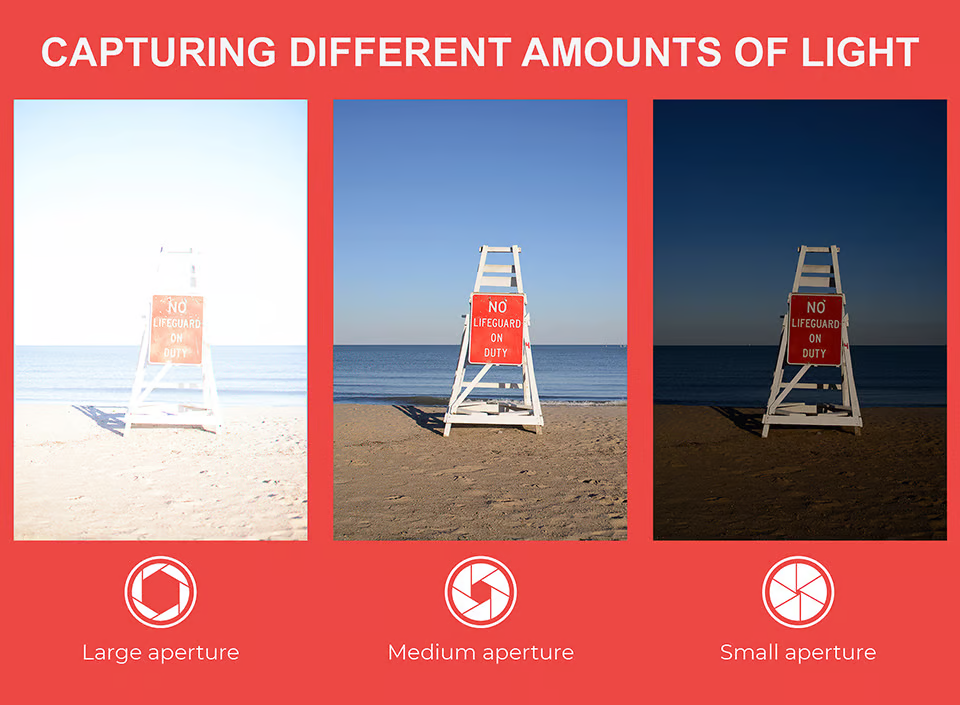
The aperture is the component in a lens used to control the size of the opening and is also the primary means of controlling the amount of light entering the camera. It is one of the members of the exposure triangle in photography.
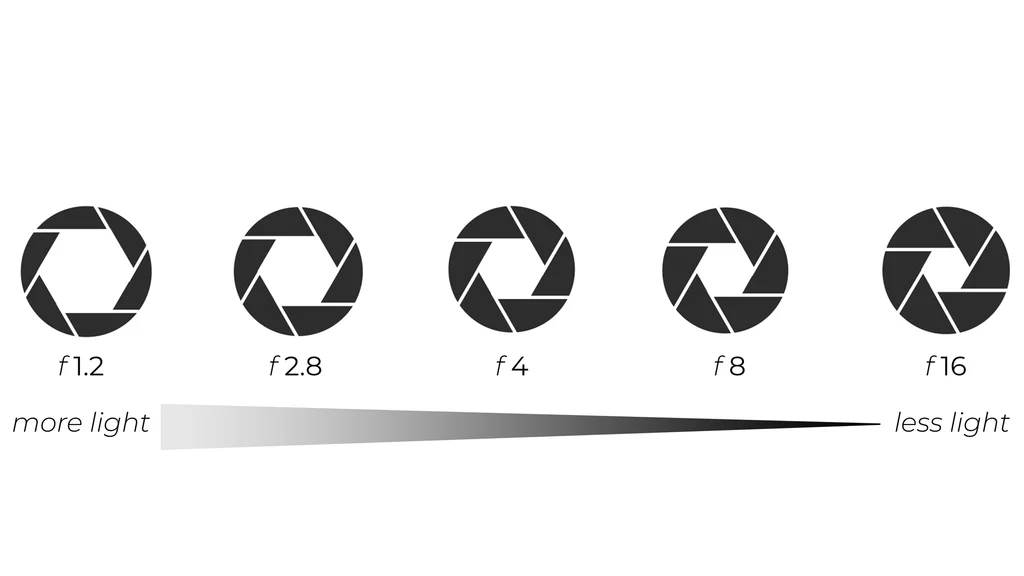
The unit of the aperture is the f-number (f-Stop), often denoted as N in formulas. It is determined by the ratio of the diameter of aperture to the focal length:
f Stop(N)=Focal Length(f)/Diameter of Aperture(D)
A higher f-stop indicates a smaller aperture, while a lower f-stop indicates a larger aperture. A smaller aperture allows less light to enter, whereas a larger aperture allows more light to enter. Increasing one stop in f-number represents a halving of the amount of light entering the lens.
Focal Length
When light enters the camera lens, it converges at a specific point within the lens, known as the Convergence Point or Nodal Point. After passing through this point, the light continues to travel, projecting an upside-down image onto the sensor. The distance from the convergence point to the sensor is called the Focal Length.
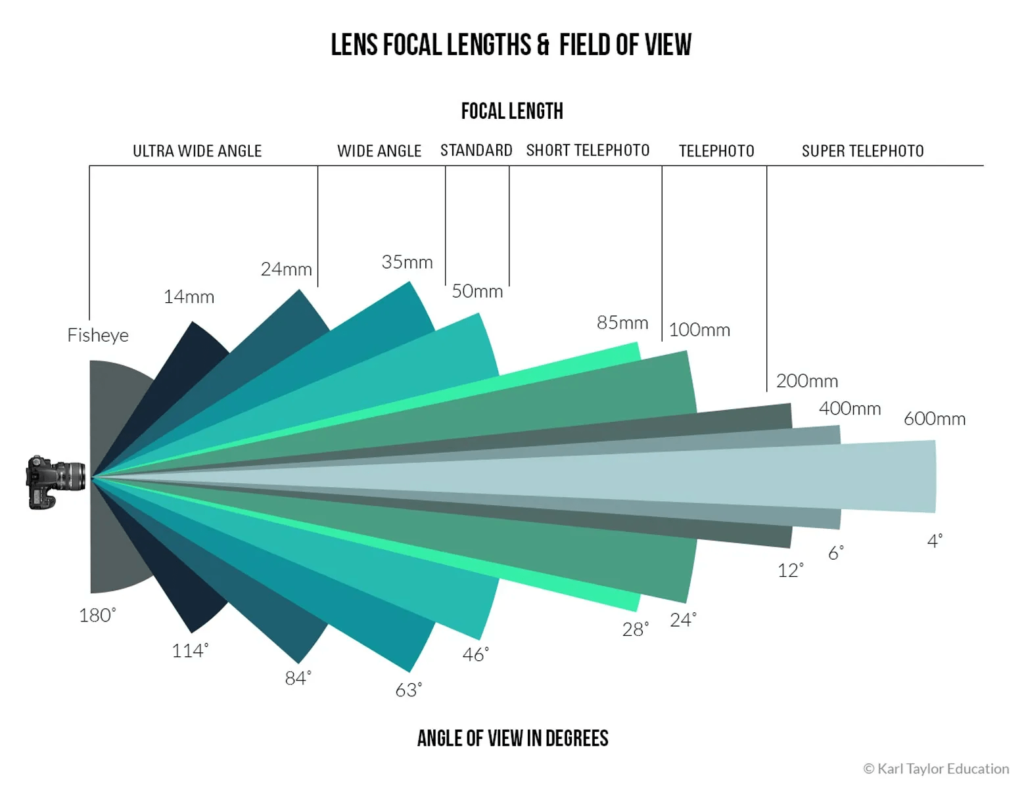
A more intuitive difference with focal length is the Field of View. As shown in the image above, a longer focal length results in a narrower angle of light entering the lens, leading to a smaller field of view and longer focusing distance. Conversely, a shorter focal length provides a wider field of view and shorter focusing distance.
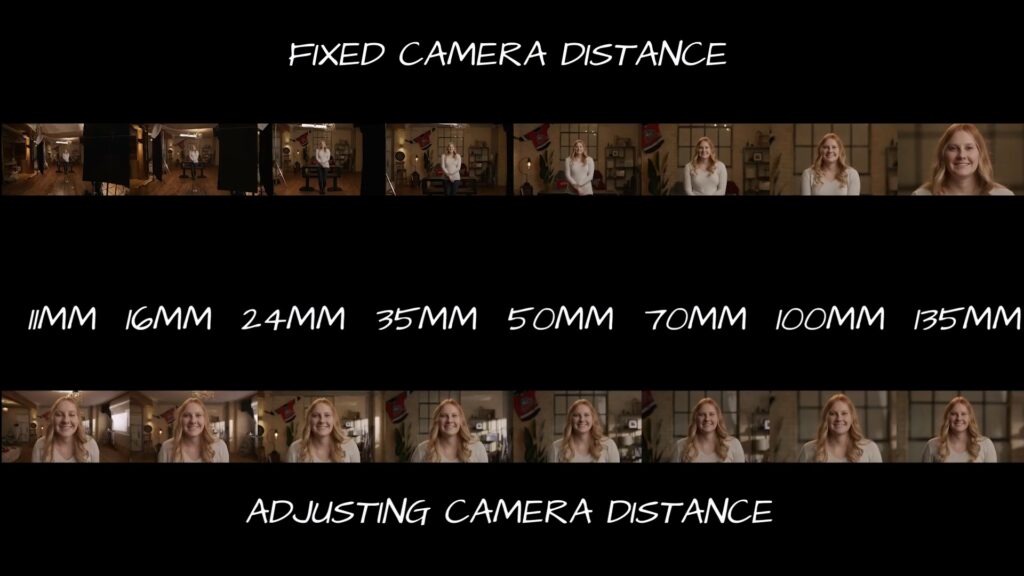
So, you might wonder why different focal lengths affect the appearance of faces differently. For instance, why does a portrait shot with a long focal length look flatter and compressed, while a short focal length lens can give a more fisheye effect and a more three-dimensional appearance?
Let’s take a look at the example below.
The first row of the image shows a fixed focal length, while the second row keeps the subject at a fixed size in the frame.
The results illustrate that deformation is due to different focal lengths. Similarly, if you crop the image from the 11 mm focal length to match the size of the 135 mm focal length image, it would also appear more flattened.
Focal Distance and Image Distance
First, let’s introduce the relevant terms:
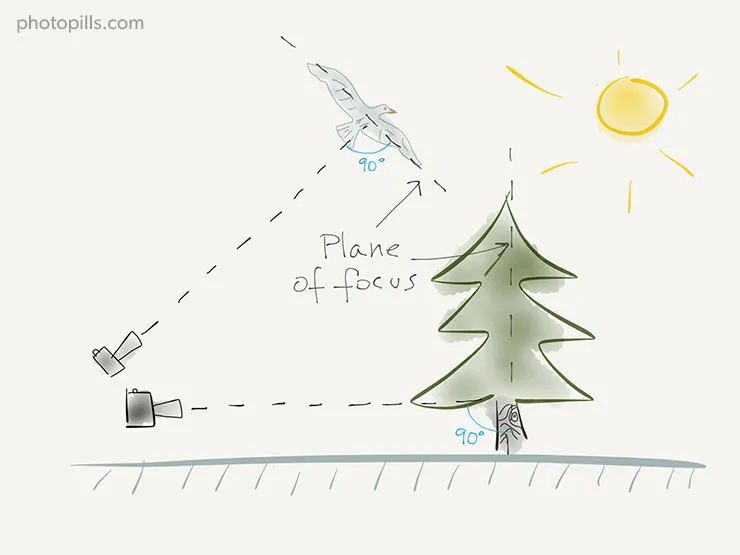
Plane of Focus: Imagine an invisible plane positioned directly in front of and always faced the lens. Points that fall on this plane are in focus.
The Focal Distance is the distance from the lens to the plane of focus, or from the convergence point to the object you want to focus on. This is also referred to as Working Distance or Object Distance, though ‘object distance’ is slightly less precise, as the object might not always be on the focus plane.
With the focal distance, there is also the imaging distance.
In the first image, on the right side, you can see the distance from the center of the lens to the far right—where the inverted, scaled-down image is projected onto the sensor. This distance is known as the imaging distance.
Understanding the imaging distance is important because it will be used in depth of field calculations later on.
Sensor Size
Also known as the Film Back, this refers to the imaging area of the camera.
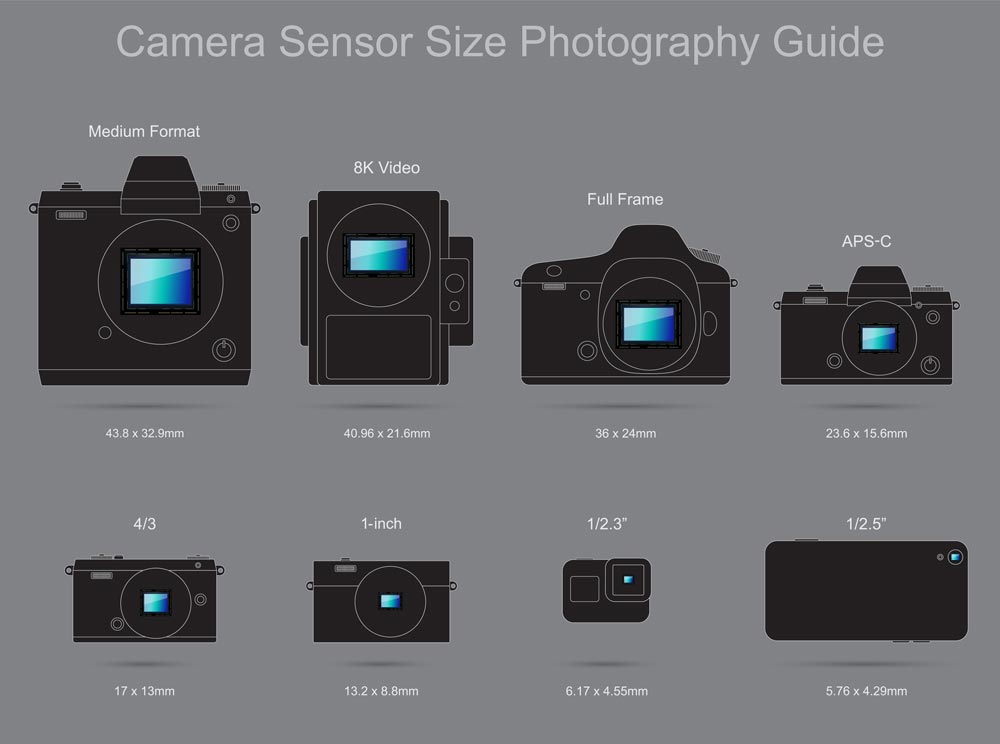
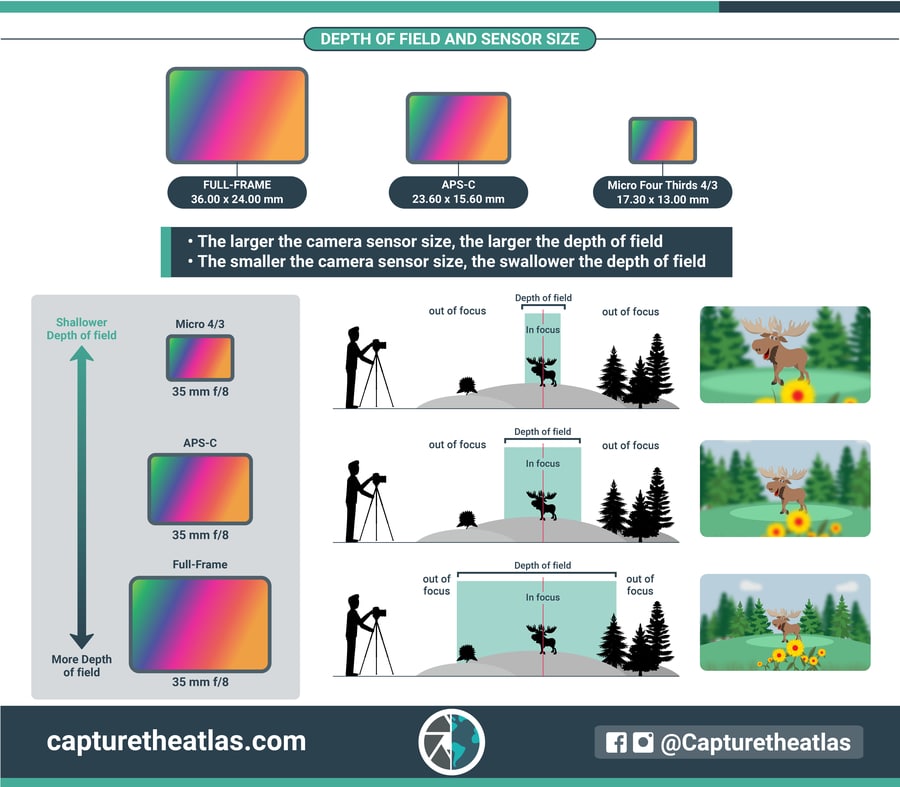
The image below lists various types of cameras with different sensor sizes. The entire series is primarily based on the Full Frame sensor, which matches the size of early film negative. This size serves as the standard reference in all photography-related calculations. Other types of sensors are often converted to their Equivalent Full Frame size.
For example,
The Canon 80D is an APS-C type camera, with a sensor size of 22.5 x 15 mm. A full-frame sensor size is 36 x 24 mm. Since 36 mm divided by 22.5 mm equals 1.6, this means that a 50 mm lens on an APS-C camera will have an equivalent focal length of 50 mm x 1.6 = 80 mm on a full-frame camera.
From a production standpoint, the sensor size usually isn’t a concern for compositors, as most films and TV shows are shot with full-frame sensors. Therefore, crop factor issues are generally not a problem.
The inseparable connection with depth of field
The first section introduced depth of field and its definition. The second one explained the components related to depth of field in photography and their functions.
In this part, we will look at how these four factors affect depth of field in practical implementations.
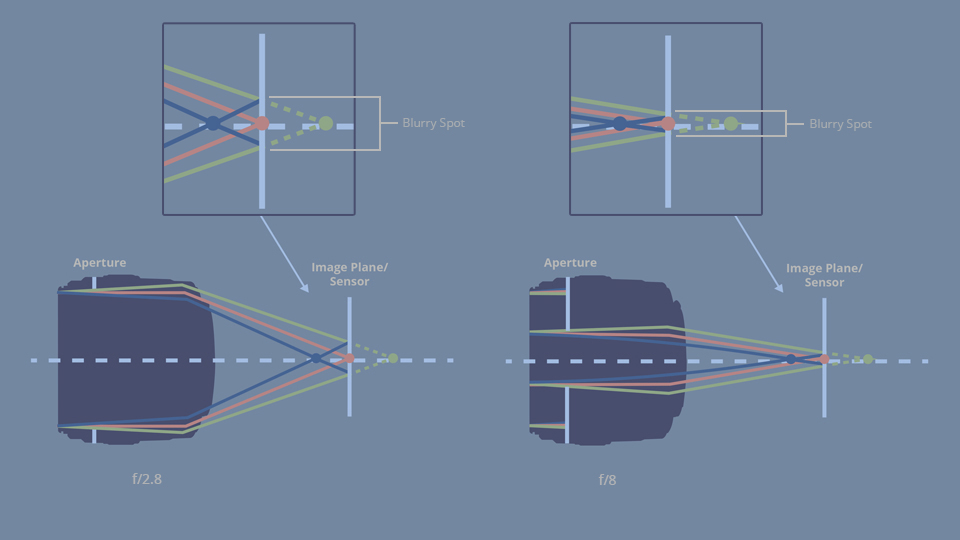
In the first row of the image left, it shows that as the aperture gets larger, the angle of light passing through the convergence point increases. This results in a narrower focus range, shallower depth of field, and a brighter image.
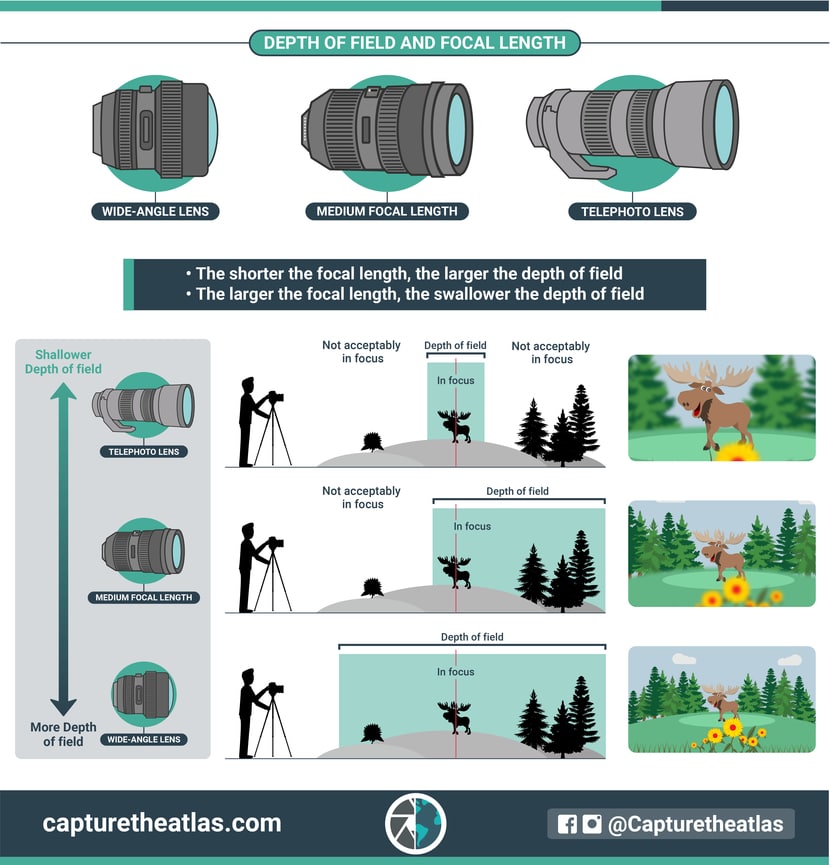
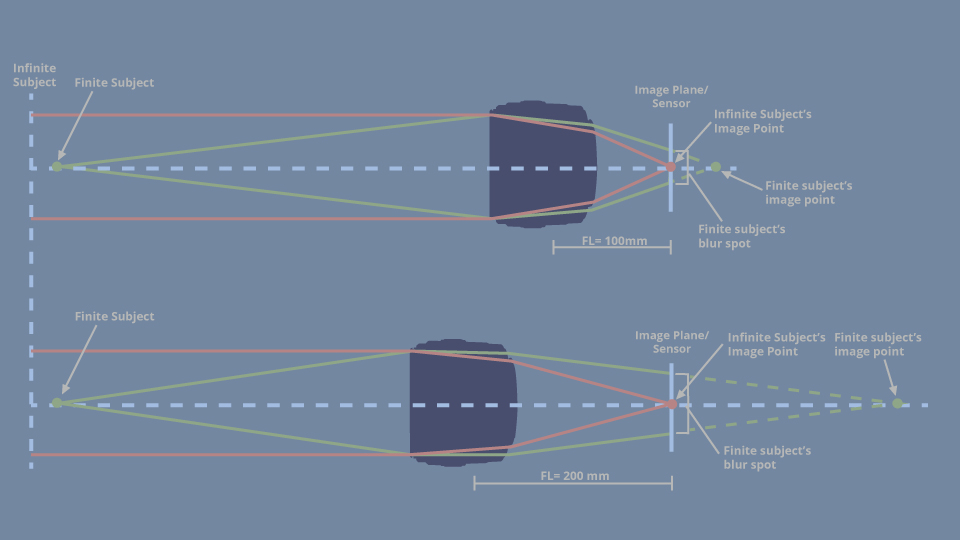
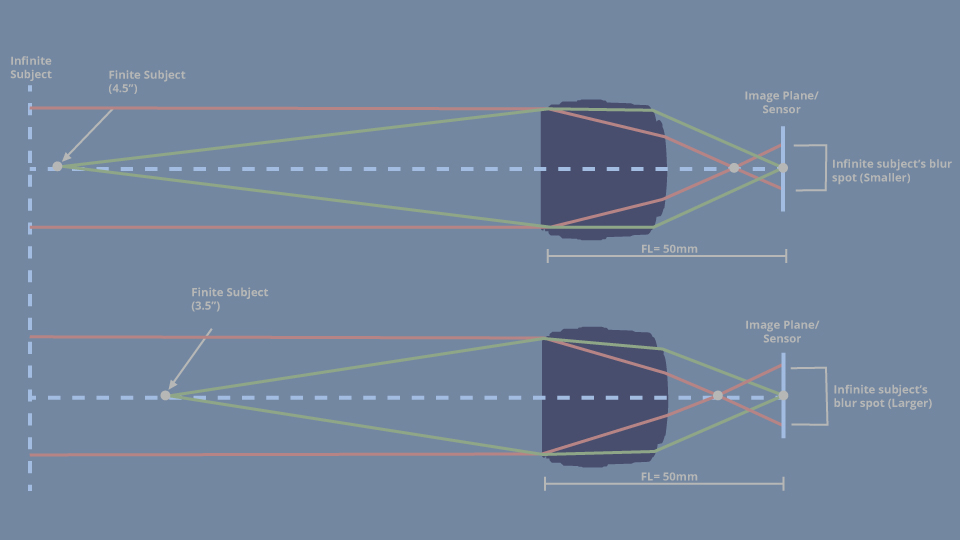
The image shows that as the focal length gets longer, the angle of light that needs to be refracted becomes smaller. In the lower part of the image, you can see that with a long focal length lens, the light passing through the lens is refracted less, resulting in larger bokeh on the sensor and a shallower depth of field.
As the focusing distance gets closer, the angle of light refraction increases. This results in a larger angle of light passing through the convergence point, leading to greater defocus on the sensor (as illustrated in the image on the right).
Although there is no detailed diagram of light paths, you can intuitively understand from the previous diagrams that as the imaging area increases—meaning a larger sensor— the angle of light passing through the convergence point becomes larger to cover the entire imaging range. This results in a narrower focus range and a shallower depth of field.
Gotta say that these aren’t absolutely necessary to understand, but most compositing supervisors I’ve worked with are capable of making these judgments, whether it’s due to practicing by works or some knowledge in photography.
For instance, they might review a shot with a 100 mm focal length and find that the background depth of field is good. Then, when they look at the next shot with a 24 mm focal length, they might notice that the depth of field seems off. In addition to quickly assessing the focal length, they also use real-world depth of field references from the plate and compare it with the previous shot to make a comparison.
Or, compositors might create a depth of field that closely matches reality using tools. Based on supervisors’ judgment, they might adjust it because the scene, the continuity of the sequence, the plot or the looks. They could make the depth of field shallower to enhance focus on a character or deepen it to allow for a wider composition.
Although it’s not necessary to push yourself to the level that can distinguish between whether the issue is with the aperture or the sensor size, since we often receive tracking data with a focusing distance of 5 or 5.99 meters, it’s unrealistic to expect that all footage will have the same focusing distance.
However, increasing sensitivity to depth of field can certainly become a significant driver in enhancing the visual appeal of a shot.
